Tutorial 4: Springs and Dampers
In this tutorial we will explore how different Kp and Kd gains of a PD controller influence the behavior of the robot. We will start by discussing what happens under the hood, and then experiment directly on the hardware.
The MIT Controller
As seen in the previous tutorial, the MoveGroup node publishes joint trajectories on the /joint_trajectory topic. The ros2_control node subscribes to this topic and executes the trajectory. The FollowJointTrajectory controller exposes two command interfaces per joint:
- Position (
q_des) - Velocity (
dq_des)
These are forwarded to each joint over a CAN bus. Each joint has its own built-in controller that drives the motor to the commanded position and velocity. The architecture used is the MIT controller, illustrated in the diagram below.
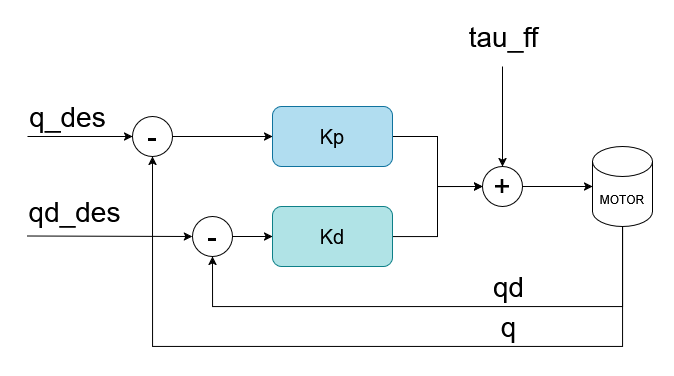
Beyond position and velocity, the MIT controller also accepts three additional inputs:
| Parameter | Description |
|---|---|
Kp | Proportional gain — acts as a virtual spring stiffness. A higher Kp makes the joint resist displacement more strongly, pulling it back to the desired position with greater force. |
Kd | Derivative gain — acts as a virtual damper. A higher Kd dissipates energy faster, reducing oscillations as the joint approaches the target. |
tau_ff | Feed-forward torque — an additional torque input, typically used to compensate for gravity (covered in the next tutorial). |
Together, Kp and Kd define how stiff and how damped the joint behavior feels when you interact with the robot physically, which is exactly what we will explore in this tutorial.
Run the Demo
If you haven't cloned the ulixarm_ros2 repository yet, refer to Tutorial 1 — Visualizing the Robot.
Open a terminal and navigate to the tutorial repository:
cd ulixarm_ros2
Optionally, open the project in Visual Studio Code, which might be helpfull later to edit the paramters.
code .
Tuning the Parameters
To change the Kp and Kd gains, open the file ulixarm.ros2_control.xacro, located at:
~/ulixarm_tutorial/src/ulixarm_description/src/ulixarm_moveit_config/config/ulixarm.ros2_control.xacro
Do not set Kp or Kd gains outside the boundaries listed in the table below. Out-of-range values can cause joint instability and unpredictable robot motion.
Admissible Parameter Ranges
| Joint | Kp range | Kd range |
|---|---|---|
joint1 | 20 – 300 | 0.5 – 3.0 |
joint2 | 20 – 400 | 0.5 – 3.0 |
joint3 | 20 – 300 | 0.5 – 3.0 |
joint4 | 10 – 250 | 0.5 – 3.0 |
joint5 | 10 – 150 | 0.5 – 3.0 |
joint6 | 10 – 100 | 0.5 – 3.0 |
Each joint tag in the ulixarm.ros2_control.xacro is defined by a block like the following:
<joint name="joint1">
    <param name="Kp">300.0</param>
    <param name="Kd">2.0</param>
    <command_interface name="position"/>
    <command_interface name="velocity"/>
    <state_interface name="position">
        <param name="initial_value">${initial_positions['joint1']}</param>
    </state_interface>
    <state_interface name="velocity"/>
</joint>
You can edit the Kp and Kd gains in each joint block.
To apply the changes you first have to build the packages. Remember to build the package from the root folder of the project
Experiments
Make sure you have followed Tutorial 1 and 2. And that the robot operates in a safe environment.
Experiment 1
Effect of low Kp
Set all Kp values to their lowest admissible value. To apply the changes, build the workspace
colcon build
To launch the demo, run
ros2 launch demos moveit_rviz.launch.py
Now gently push the robot's gripper with your hand.
How does the robot feel? Does it resist your push or yield easily?
Effect of high Kp
Now set all Kp values to their highest admissible value. To apply the changes, build the workspace
colcon build
To launch the demo, run
ros2 launch demos moveit_rviz.launch.py
What has changed? Think about the spring analogy, a stiffer spring resists displacement more strongly.
Experiment 2
Effect of low Kd
Set all Kd values to their lowest admissible value. To apply the changes, build the workspace
colcon build
To launch the demo, run
ros2 launch demos moveit_rviz.launch.py
Gently displace the gripper, then release it.
What happens as the robot returns to its target position? Does it overshoot or oscillate?
Effect of high Kd
Now set all Kd values to their highest admissible value. To apply the changes, build the workspace
colcon build
To launch the demo, run
ros2 launch demos moveit_rviz.launch.py
What has changed? Think about the damper analogy, a stronger damper dissipates energy faster and suppresses oscillations.
Restoring Default Values
Once you have finished experimenting, restore all parameters to their default values using the table below.
| Joint | Kp (default) | Kd (default) |
|---|---|---|
joint1 | 200 | 2.0 |
joint2 | 300 | 3.0 |
joint3 | 200 | 2.0 |
joint4 | 100 | 1.0 |
joint5 | 80 | 0.5 |
joint6 | 50 | 0.5 |